Saturday, October 31, 2009

Radiator Removal

I was about to send the heater core to the shop to have it cleaned, tested for leaks, and rebuilt if need be when it occured to me that it was on the same fluid system as the radiator. It'll be a shame to have the heater core cleaned only to have crude flushed back in from the radiator, so I decided to pull it and have it sent to the shop together with the heater core. Besides, I've already spilled most of the coolant all over the garage floor last week, so there can't be much more of it left to make too big of a mess! The radiator is mounted on with 2 bolts, but removing it isn't as straighforward as one might think. First, the plastic fan shroud had to be removed ... or rather detached from the radiator, since it can't actually be removed until the radiator is out of the engine bay as the fan is in the way. However, in order to get to the bolts for the fan shroud, the coolant overflow bottle had to be removed from one side and the air intake hose removed from the other side.

Radiator In: Radiator In Radiator Not Home: Radiator Not Home

Once the fan shroud was out of the way though, it was a matter of removing the 2 bolts securing the radiator, detaching the hoses, and pulling the radiator from the engine bay. With the radiator out of the way, and easy access to fan, I'm planning to remove that too to have it repainted. "One thing leads to another" - that's the theme here! At this rate the Volvo will be out of commission for weeks.

Sunday, October 25, 2009

Heater Box - Assessing The Damage

This is how the heater unit looks like removed from the Volvo (pictured below). Separating the two halves of the box revealed the heater core, blower motor, and about 2 acres of leaf matter. There's some rust on the inside walls of the box and the rubber seals for both the front and rear vents as well as the gasket for the blower housing have long disintegrated. In addition, the blower motor has seized up - even turning it by hand was difficult. So ... lets see, broken capillary sensor cable to the heater core, plus all of the above ... I've yet to send out the heater core to the radiator shop to have it pressure tested, but it probably has leaks too - pretty much everything is shot!

Heater Box: Volvo P800 Heater Box Two Halves Separated: Heater Box - Two Halves Separated

My initial thought of feeding the remaining capillary sensor cable into the heater unit in replacement of the broken-off piece is probably not feasible either, as the very definition of capillary means that it has an internal diameter to hold liquid. This could only mean, broken capillary sensor cable = no more internal liquid = can't un-ring this bell! The entire heater control valve will need to be replaced if my assessment is correct. I'll have to do more research to find out. Well ... on the bright side, I had enough leaf matter from inside the heater box to make compost for the garden. I probably shoudn't have thrown those out as there might have been some seeds of exotic plant species that went extinct 3 decades ago.

Heater Core Exposed: Heater Core Exposed Is This a Rat's Nest? Is This a Rat's Nest?

Saturday, October 24, 2009

Removing The Heater Box

After spending much of last weekend eyeballing the heater unit and formulating a gameplan, it was go time! I figured since the heater doesn't work anyway, I coudn't wreck it any further! Besides, if I was in "way over my head", I could always revert to plan A which is to send it to the shop. Before commiting to the destruction derby, I invested some time in taking lots of photos and labeling everything so that I'd know how to put everything back together. 
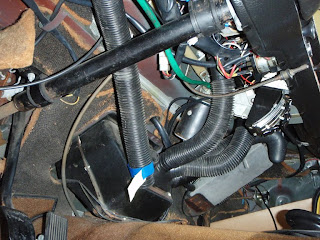
In my experience with the Volvo thus far, there's always that one screw or one nut that's not with the program - that just refuses to budge or have the threads all worn down. Well ... it was no different in this case, but I was prepared for it this time as I quickly singled it out while eyeballing the battle field last weekend. As this could be the deal breaker, I made the removal of this one problem nut the first step. This sucker is out of 4 nuts that secures the heater box to the firewall in the engine compartment - and it's just a pain to get to! Tucked right between the firewall and the heater box, and under the air intake duct, there's just not enough room to work a wrench from either direction. After about 20 minutes, I finally did get a couple of good turns of the wrench to loosen up the nut. It was another 10 minutes of turning the nut with my fingers before I got it out! Good thing I spent those 2 weeks in the Shaolin Temple as a young boy strengthening my fingers studying the sacred art of "Slouching Tiger Squatting Dog." Note to self: replace this nut with wing nut in case I have to do this again in the future.

Defroster Hoses Under Dash: Defroster Hoses Under Dash After Removal of Defroster Hoses: Volvo P1800 Heater - Defroster Hose Outlet
My heater removal check-list pretty much went as follows:
  1. Label and photograph everything - check
  2. Disconnect electric cables from blower motor - check
  3. Remove heater defroster hoses from under the dash - check
  4. Disconnect floor and defrost control cables from heater box (car interior) - check
  5. Disconnect temperature control cable from heater control valve (under dash) - check
  6. Remove radiator cap and coolant overflow bottle cap in preperation for draining the heater core - check
  7. Line the garage floor with spill trays to catch runaway coolant while draining the heater core - check
  8. Have plastic bottle ready to hold drained coolant from heater core - check
  9. Pull hoses from heater core and drain coolant all over engine compartment and garage floor while carefully avoiding the plastic bottle - check

I ended up "borrowing" the aquarium gravel siphon from my fish pond to catch the remaining 3 or 4 drops of coolant from the heater core and to funnel the flow to the spill trays on the ground.

Heater Control Valve: Volvo P1800 Heater Control Valve Draining Coolant From Heater Core: Draining Coolant From Heater Core

While I was under the dash labeling components, I noticed that the heater control valve had this long copper-like wire that was just dangling freely and leading to nowhere. I later found the "other" half of the wire coiled in an "S" shape inside the heater box right next to the heater core. Turns out that this is the capillary sensor cable from the temperature sensor in the heater control valve to the heater core in the heater box - yes mine was already broken. If it wasn't, the heater control valve would have to be removed from under the dash and the entire contraption - heater box, attached capillary sensor wire, and heater control valve would be removed as a single unit when pulled from the engine compartment. It doesn't seem that bad as I think the heater control valve has enough of the capillary sensor wire left to just run what's remaining back into the heater box. If this thing is supposed to regulate the heated air temperature by sensing the ambient air and automatically regulating the flow of hot antifreeze through the heater core via the heater control valve, shouldn't it be placed outside of the heater box like where I found the broken-off piece instead of inside the heater box, right next to the core where the temperature is much greater that the ambient air inside the car? Answers anybody? Scientists? Master Yoda? Anyone?
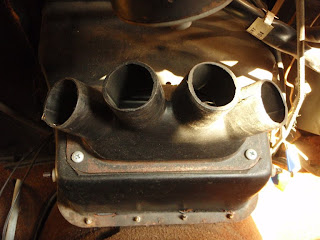
Before: Engine Bay - Before Heater Box Removal After: Engine Bay - After Heater Box Removal

Upon removel of the heater box from the Volvo, my initial assessment is that all the external rubber seals are toast and need to be replaced, all screws and nuts need to be replaced, the box needs to be repainted, the blower motor needs to be fixed, and the heater core needs to be flushed and checked for leaks. We'll see what lies in store tomorrow as I crack the heater box open. Oh yeah - since I'll be repainting stuff, I think I'll also repaint the part of the heater control valve that sicks out of the firewall into the engine bay. Should I keep everything at the standard black, or should I dare go with a splash of color ... say red or yellow?

Thursday, October 22, 2009

New Toys!

Well ... I went ahead and sprung for Kobalt's 7-Piece Ratcheting Wrench Set. It's about time I graduated to some serious tools! No kidding - everything I've done on the Volvo thus far has been with a screwdriver, a single wrench that I've owned since my college days, a swiss army knife, oh ... and the rotary tool of course! These mechanic tools by Kobalt are really nice and I can't wait to go nuts on them this weekend! They cost more than other wrenches, but hey - if I do wreck the car with them, at least I'll look good doing it! At some point in the future, I'd like to add on to the tool collection Kobalt's 40-Piece Mechanics Ratchet Tool Set.

Before: Old Tools After: Kobalt 7-Piece Ratcheting Wrench Set

Sunday, October 18, 2009

Engine Compartment Hoses

I didn't really accomplish much on the Volvo this weekend as most of the time was spent working on cleaning and re-pumbling the backyard pond filter and winterizing both the main fish pond and the separate feeder fish holding pond by installing heaters - yeah ... don't ask. I did however, spend a little time cleaning the hoses in the engine compartment and restoring them to their original slick black finish with some application of Armor All rubber protectant.

Before: Engine Compartment Hoses - Before After: Engine Compartment Hoses - After

A small job that made a big difference! Anything to draw attention away from the "Antiques Roadshow" valve cover! At some point, I'll have to remove the valve cover to have it rechromed, but I've been a little apprehensive as I'm not sure what to expect during the removal process. Is it under pressure? Will it blow up in my face? What's under there besides valves? What's a valve? Is it full of oil waiting to leak all over the engine as I remove it? Are ninjas hiding under there? Just some of the things that keep me awake at night.

Before: Engine Bay Hoses - Before After: Engine Bay Hoses - After

Saturday, October 17, 2009

Center Console Completed

Finally managed to secure the appropriate automotive carpet to line the trays of the center console after looking high and low all over town! The first couple of days of the search were rather sobering, as the first 5 stores that I went to were out of business - courtesy of the recession. Classic Interiors in Fresno, specializes in restoring automotive interiors and tops, and they just happen to have material that closely resembled what I had in the Volvo. Rick "Stitch" Coleman, the proprietor, was gracious enough to part with a piece of remnant material for $5.

Restored Center Console: Volvo 1800E Center Console Heater Box - Interior: Heater Box - Interior

The restored center console is still not in the Volvo yet as I've decided to address the rather sad looking heater box while I have everything apart and easy access to it. As seen in these photos, some of the metal components have rust, and the internal vents have undoubtedly froze in place. Also, the blower motor is not working and the heater's radiator probably needs to be checked for leaks and possibly re-cored. After spending much of the day just "eyeballing" the contraption and formulating a gameplan, it seems that the heater box is a single unit with the top part assembled in the engine bay and the bottom extending through the firewall into the interior where all the hoses and controls are attached to it.

Heater Box - Interior: Heater Box - Interior Heater Box - Engine Bay: Heater Box - Engine Bay

Apparently, the heater unit is part number one of the Volvo 1800, hence everything else was built around it! In other words, it ain't gonna be a walk in the park and I'll need some serious tools for this job. In addition, removal of the heater box requires that the heater radiator be drained - I have no idea how this is done at the moment except for maybe start yanking at hoses? Anyways, I'll be psyching myself up for the project by researching that procedure during the week in addition to purchasing tools and some new seals and gaskets in anticipation that it might need new ones.

Saturday, October 10, 2009

Restoring The Center Console

In addition to the missing carpet piece from the mid-section where the shifter is housed, the center console of the Volvo had stains of what smelled like WD-40 all along the sides, presumably from residue dripping after being applied (not by me) to the heater controls directly above it. Vigorous cleaning with Armor All vinyl cleaner and protectant only served to make the dark areas surrounding the stains even darker, thus highlighting the stains even further. So, once again I'm doing this the old-fashion way ... the old blood and guts routine. Doing this proper would entail removing the center console and respraying it black with vinyl paint, refurbishing the hardware for the lock box, and installing new carpeting material in the console's trays. I had to remove both seats in order to remove the center console from the vehicle, which revealed an unpainted section of the floor panel showing the original "British Racing Green" color of the Volvo as seen here in the photo below.

Volvo 1800E Center Console: Volvo 1800E Center Console Center Console Removed: Center Console Removed

Some new stainless steel screws and an hour with the rotary tool while waiting for paint to dry rendered the lock box hinge looking brand new.

Lock Box Hinge - Before: Lock Box Hinge - Before Lock Box Hinge - After: Lock Box Hinge - After

A couple of coats of black vinyl paint and the unsightly stains were all gone from the center console. The only piece of the puzzle that's still missing are the new carpet pieces which I have yet to source. I'll be driving all over town this week visiting auto upholstery and carpet stores to see if they can match the original dark brown carpet that I had in there and if they have any remnants they would sell to me, as I'm not interested in purchasing a 10 x 12 feet piece of carpet just to get at 12 square inches! If all goes well, the console should be back in the Volvo next weekend!

Before: Volvo 1800E Center Console - Before After: Volvo 1800E Center Console - After
Volvo 1800E Center Console - BeforeVolvo 1800E Center Console - After

Saturday, October 3, 2009

Rebuilding Rear Seat Frame - Part 2

Finally! After hours of labor polishing the old clips and mounting hardware with the rotary tool and fabricating seat webbing out of new Pirelli webbing, the rear seat frame rebuild is done and back in the car! I don't know why I even bothered since no one will ever see it and there's no way anyone can fit in the back seat.

Seat Frame with Pirelli Webbing:
Finished Seat Frame Reinstalled: All the Hard Work Hidden ...