Sunday, November 29, 2009

Painting Over POR-15

... was not a rewarding experience! The POR-15 rust preventative paint comes in black, semi-gloss black, grey, silver, and clear. Therefore, if the finished project is to be in any color other than the ones listed, it has to be primed and top coated. Enter "tie-coat primer" by POR-15. This is a special interlocking primer that was made specifically to adhere to cured POR-15. Well not really ... as I found out the hard way! In practice, I found that it does not "adhere" to cured POR-15 ... even after sanding the POR-15 finish! In addition, I had to build on whatever little of the first coat that did manage to adhere to the POR-15 finish with a second, and third coat ... with 12 hours of drying time between coats! What a bloody waste of time! On top of that the whole thing had to be sanded down to a smooth finish before final application of paint. In short, this product does not work as advertised. In fact, the instructions that came with it suggests that the best method for applying the primer over cured POR-15 is to first pre-prime it with their "self etching primer!!!" A primer for the primer? Does not compute! In experimentation however, I did find that the best way to get the tie-coat primer to take, is to slap it on 2 - 6 hours after the final coat of POR-15 - that is before it is cured, tacky with a slight finger drag. The first coat doesn't have to be pretty, just a base to get the second coat on. That way, all you need is 2 coats of the primer instead of the 4 to 10 if attempted over cured POR-15! I should have just gone with their spray on self-etching primer that supposedly works on cured POR-15 too and can be topcoated within 30 minutes. I've had nothing but positive experience with their POR-15 rust preventative paint, but this tie-coat primer really lost some major points with me. Next time, I'll just send stuff to the shop to have them powder-coated right after sandblasting instead of screwing around with this stuff. While struggling to get the tie-coat primer on, I had to fanangle-up this applicator using a piece cut out from a foam brush and some wooden coffee stirrers from Starbucks. This "modified" applicator was used to get primer onto areas not feasible with a traditional foam brush:

Modified Foam Applicator: Folds in Half For Dipping:
A Few Twists to Wring Out Paint: Goes Where No Other Foam Brush Goes:
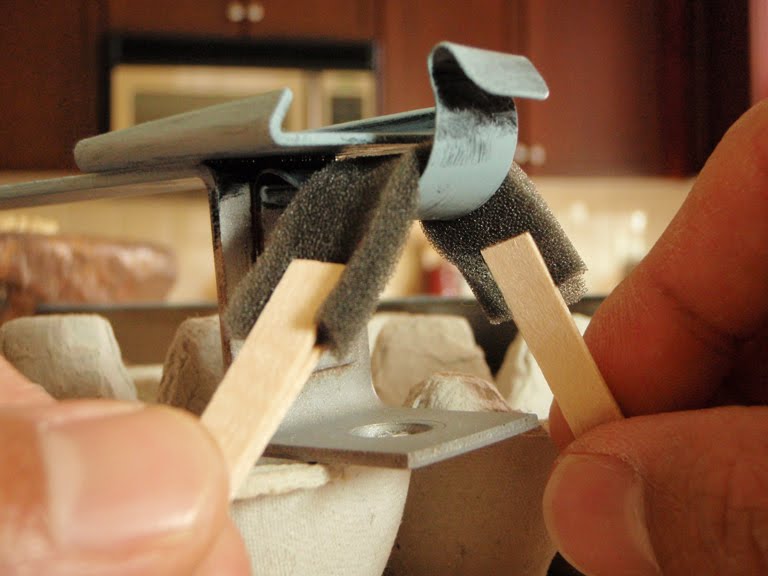
Saturday, November 28, 2009

Air Intake Grille

I've been spending a lot of the Thanksgiving weekend painting, priming, eating turkey, watching paint dry, sanding, repeat ... none of it worth any pictures. I thought I had the whole weekend planned out - sanding primer down on some components and spray painting a fresh coat of paint, when a neighbor caught me in the process of sanding and said "You know ... you'll get a much smoother surface by wet sanding that." Huh? Wet sanding? So now I'm back to square one, repriming, and googling "wet sanding." Well, at least I have these photos to put up. Somewhere between the 4th helping of turkey and watching paint dry, I busted out the Dremel rotary tool and went to town on the clips and fasteners for the air intake grille. Both the air intake baffle which has a fresh coat of paint from last week and the polished grille are now back in the Volvo.

Air Intake Baffle: Volvo P1800 Air Intake Baffle Air Intake Grille: Volvo P1800 Air Intake Grille

Friday, November 27, 2009

Heater Blower Motor

The final piece for the heater blower motor is done! I've been waiting for the back plate of the blower to be returned from the sandblasting facility, and now it has 2 coats of the black POR-15 rust preventative paint on it to match the rest of the heater box. I'm just waiting for one more component of the heater box to be completed before reassembling the whole contraption. See the big difference in the before-after photos below:

Before: Volvo P1800 Heater Blower Motor - Before After: Volvo P1800 Heater Blower Motor - After
Before: Volvo P1800 Heater Fan Motor - Before After: Volvo P1800 Heater Fan Motor - After

Sunday, November 22, 2009

Heater Control Valve & Heater Fan Motor

I finally have the heater control valve and the heater fan motor sorted out. I've been working on these two components for weeks, a half-hour here, a half-hour there - just whenever I have the time. The foam gasket had melted all over the heater control valve causing a tremendous mess, and the pipes had been painted over. Quick work with the Dremel rotary tool revealed a pleasant surprise - copper pipes on the heater control valve! All the moving parts and internals were also cleaned up using electronic contact cleaner and Q-tips. Why the electronic contact cleaner? There are no electrical parts in the heater control valve, but the electronic contact cleaner was all I had so I decided to give it a try. It works great, especially in dissolving the melted foam away. All it needs now is some machine oil on the moving parts and it's good to go.

Heater Control Valve - Before: Heater Control Valve - Before Heater Control Valve - After: Heater Control Valve - After

A few weeks ago, while disassembling the heater core, I discovered that the capillary sensor cable from the heater control valve was broken. Turns out that this heater control valve must have been a replacement unit at some point in the Volvo's life as it has a capillary sensor that is still in tact. The first photo above shows this capillary sensor cable with the "bulb" on the end. The theory is, the capillary cable has ether in it which expands as it exposed to heat, and thereby toggling the valves to open or close slightly to regulate the flow of heated coolant through the heater core. Well ... I've read some feedback on the 1800list that this whole contraption never really worked that well anyway in "automatically" regulating heat, and you're better off just regulating it manually via the heater control cables. I decided to put this to the test and submerged the capillary sensor cable into a pot of water over the stove and slowly heating the water to a boil. Yup - doesn't work at all! Don't bother routing it back inside the heater box where it originally belongs. Just roll the capillary sensor cable up into a neat coil, and tuck it out of sight when replacing or reinstalling the heater control valve. You'll pass out from heat exposure long before the heater control valve decides to work auomatically - case closed!

Heater Fan Motor - Before: Heater Fan Motor - Before Heater Fan Motor - After: Heater Fan Motor - After

The heater fan motor - now this thing was a piece of work! Everything had siezed up! The fan would not rotate and there was a thick layer of dirt on everything. I emptied half a spray can of electronic contact cleaner into this sucker before things started moving again. Q-tips ... lots and lots of Q-tips - that's all I have to say. I need to get some machine oil in it to lubricate the moving parts and I won't know for sure if it's going to work until I hook it back up to the car, but I have a feeling this one's going to be a winner!

Saturday, November 21, 2009

Chrome!

I just got back some pieces from the electro-plating shop. Since I have the radiator out and a clear shot at the fan and pulley system, I decided to yank those out to have the fan re-painted and the fan-belt pulley chromed. Pictured below clockwise from top is the water outlet pipe from the engine to the radiator, spacer between the fan and the pulley, and the fan-belt pulley. Both the water outlet pipe and the spacer are made of aluminium, and therefore cannot be chrome plated. The shop polished them the best they could instead. The fan-belt pulley however ended up with 4 layers of plating: 2 layers of copper, followed by nickel, and finally chromium. This thing looks like a piece of jewelry now ... I'm considering not putting it back on the engine and wearing it around my neck instead! The cowl intake grille is another piece that is made of aluminium, but the polishing process rendered it looking as good as chrome anyway. All of these were done for $60 - Not bad Kimosabe ... not bad.

Engine Components - Before: Engine Components - Before Engine Components - After: Engine Components - After
Cowl Intake Grille - Before: Cowl Intake Grille - Before Cowl Intake Grille - After: owl Intake Grille - After

Friday, November 13, 2009

Heater Screws, Nuts, And Bolts

Bought a whole bunch of stainless steel screws, nuts, bolts, washers, and radiator hose clamps for the heater box from the neighborhood Ace Hardware store. This store is turning out to be a great source for miscellaneous restoration hardware! I was even able to find replacements for the nylon bushings that I lost. The original nylon bushings were used to secure the heater vent spindle to the heater box ... and I didn't actually lose them, as I know exactly where they went - disintegrated during the sandblasting process when I left them attached! The original bushings are no longer produced of course, but the replacements that I found for them are called "expansion nuts". They are made of rubber with the metal "nut" part embedded in one end as depicted in the photo below on the right. I found that the size 8-32 were a perfect fit both on the outer diameter for the holes in the heater box as well as the inner diameter for the spindle. The nut part had to be cut away from the expansion nut, leaving only the rubber sleeve for the vent spindle to freely thread through.

New Hardware for Heater & Radiator: Heater Hardware Customizing New Spindle Bushings: Expansion Nuts

Pictured below is the half-painted heater box showing the 2 holes on both ends for the vent spindle. The photo on the right shows the installed modified expansion nut with the spindle threaded through. With some new flat washers and "D" style clamp washer to hold it all in place, it should be good to go!

Holes for Heater Vent Spindle: Spindle Holes in Heater Box Retrofitted Replacement Bushing : Expansion Nut & Spindle

Sunday, November 8, 2009

Painting The Heater Box

The following are before-and-after photos of the heater box after sandblasting. The POR-15 rust preventative paint adheres best to bare metal so instead of wasting weekends sandpapering the old paint by hand, I paid a shop in town $30 bucks to sandblast the heater box and the air intake duct. That grey finish on the heater box after sandblasting isn't any kind of coating - it's what the bare metal looks like.

Heater Box Before Sandblasting: Volvo P1800 Heater Box - Before Heater Box After Sandblasting: Volvo P1800 Heater Box - After Sandblasting

The night before, I had to "MacGyver-up" some home-made daubers to paint the insides of both the hinges for the defrost and floor heater vents. Cannibalizing the foam from a regular foam brush, I glued the smaller strips of foam to a bunch of wooden coffee stirrers from Starbucks, clamped the ends with clothes pegs and allowed them to cure overnight. Worked like a charm! The photos below show one of the vent hinges, the donor foam brush, a dauber being cured, and a finished bunch of daubers.

Home-Made Daubers: Home-Made Daubers Home-Made Dauber in Action: Home-Made Dauber in Action

During the sandblasting process, I left the nylon bushings for the heater vents on the heater box, and these ... I found out the hard way, disintegrated in the process! I'll have to fashion up some sort of replacement to get the vents to work properly as the original parts are no longer available ... and have been for a long while! I was only able to paint the insides of the heater box this weekend as I have to wait for them to dry before I do the outsides. Besides, I'm running out of POR-15 and have to order a fresh batch. The good thing is they sell the stuff in a "starter kit" that has a 4 oz. can of POR-15, 2 small bottles of marine clean and metal-ready, a couple of brushes and a pair of latex gloves - just enough product to do the entire 3-step rust-stopping process for the small jobs that I've been tackling.

Nylon Bushing for Heater Vent: Nylon Bushing for Heater Vent POR-15 Curing in the Backyard: Heater Box Curing in the Backyard

Saturday, November 7, 2009

Air Intake Baffle & Radiator Fan Shroud

I started this weekend's project by repainting the plastic air intake baffle (that diverts air via the cowl vent from the hood of the Volvo to the heater box) and the radiator fan shroud.

Air Intake Baffle - Before: Volvo P1800 Air Intake Baffle - Before Air Intake Baffle - After: Volvo P1800 Air Intake Baffle - After
Radiator Fan Shroud - Before: Volvo P1800 Radiator Fan Shroud - Before Radiator Fan Shroud - After: Volvo P1800 Radiator Fan Shroud - After

Friday, November 6, 2009

Remember This Guy?

Mr. Bizarro really did a number in my garage this week. He snuck into the garage when I came home from work late last night and spent the night there. This morning, I was greeted by the stench of his greatest hits that he left me - a big pile of crap, cat vomit, and a couple puddles of cat pee just for color. Good lord! The stench was unbearable! The burning and watering of the eyes was worse. Each time I stepped into the garage, I'd start to feel nauseous, followed by sweaty palms and an elevated heart rate. A couple of seconds later, my eyes would begin to bleed and shortness of breath would follow. That's about all I could endure before I start blacking out in the garage. Thanks Mr. B! I guess I'll be trading in some of the quality time with the Volvo this weekend to do damage control. There's just no way that cat pee is coming off the concrete floor once its had a night to marinade! Not cool, Mr. B! Not cool!

Thursday, November 5, 2009

Heater Seals & Gaskets

Volvo 1800 Heater Gaskets & Seals

This is what $85 bucks worth of rubber seals and foam gaskets look like. On the left, from top to bottom is the heater flap gasket, defrost flap gasket, gasket for heater control valve, and the drain tube for the heater box. Right down the center are the three rubber bushings for the radiator mounts. On the right, from top to bottom is the seal for the cowl air intake duct, seal between the heater box and cowl intake duct, and lastly the gasket for the blower motor. The heater box and cowl air duct are currently in the shop being sandblasted to stip off the old paint. I'm hoping they'll be ready by tomorrow so that I can have them repainted this weekend.

Wednesday, November 4, 2009

Radiator & Heater Core Restored

Just got the radiator and heater core back from the shop. They were cleaned, checked for leaks, and painted. Aside from being rather clogged up, there were no leaks. Here are some before-and-after shots. I even bought a new cap for the radiator.

Heater Core - Before: Volvo 1800 Heater Core - Before Heater Core - After: Volvo 1800 Heater Core - After
Radiator - Before: Volvo 1800 Radiator - Before Radiator - After: Volvo 1800 Radiator - After

Sunday, November 1, 2009

Do Dats & What Nots!

Heater Control Cable Clips

I'm still in a holding pattern with the heater box, as it needs to be sent out for sandblasting to remove the old paint. I did however, manage to keep myself amused with the rotary tool for a couple of hours working on the clips for the heater control cables and the latches that hold the defrost and heater flaps in place. Here's a before-and-after photo along with the 4 most used attachments that I rely on for this kind of work. First from left-to-right is the sanding bit that I always start with to remove surface corrosion, followed by the grinding tip to get into areas not feasible with the sanding bit. Next, is the stainless steel rotary brush to get into the nooks and crannies, and finally the rubber polishing wheel to bring metal to a shine.

Before: Coolant Overflow Bottle - Before After: Coolant Overflow Bottle - After

The coolant overflow bottle also got some attention this weekend. If you recall, the cap for the bottle had already been restored back in September. As seen in these photos above, the inside of the bottle started out pretty nasty. For the cleaning process, I "borrowed" a handful of gravel from the fish pond, dumped it into the bottle, added some water, a slice of lime, and shook it like a martini. See ... I did learn something in college! The fish pond has also been very handy in the restoration process ... that's 2 saves in 2 weekends! If you don't have a fish pond, use a brush instead - that usually works.