Sunday, February 28, 2010

A New Clue!

I've been making observations and taking notes since performing the "rough" timing yesterday and here's what found: The engine idles at 1,500 rpm from a cold start. That's 1,500 from the car's tachometer ... which could be a bit off. Idle doesn't sound blaring loud though, rather a pleasing deep old Volvo like rumble ... or old school bus like! Anyways, idle drops to 1,000 rpm at around the 6 minute mark presumably from the engine warming up and the Auxilary Air Valve (AAV) closing down and restricting air to bring the idle down (as it should). At around 7 minutes, the idle starts to stutter and the engine soon stalls.

First off, 6 minutes before the engine warms up and idle drops seems a tad long I think ... but who knows, maybe that's normal? Second observation is at the time the idle starts to drop, the fumes from the tail pipe begin to smell like gasoline ... that and my eyes start to water. This has been pretty consistent since the first day the car started acting up. Me thinks, during a cold start with the engine still cold and the AAV open, there's plenty of air to burn off the fuel. As the engine warms-up and the AAV closes, less air gets through leading to incomplete combustion of fuel. Run the engine long enough (7 minute mark) and it soon stalls from air starvation compared to the amount of fuel being served, and finally there's enough fuel left over to flood the engine to prevent a subsequent warm or hot start until the excess fuel evaporates.

Well ... I did some reading, and learned a new word: "running rich" - when there's a high fuel-to-air ratio in the chambers ... exactly what I'm experiencing! And I though it meant hanging out with the golfers at the country club in the good side of town ... no that's "running with the rich" ... nevermind. Here's another tell-tale sign of running with a rich mixture: black sooty fouled plugs (pictured below). These are brand new spark plugs by the way!

Fouled Spark Plug: Fouled Spark Plug Crankcase Breather Hose: Crankcase Breather Hose

Now, armed with this new clue and a set of quantitative base-line data to compare against (specifically the elapsed time before things start to go south), I think my next move ought to be resetting the timing followed by checking the fuel pressure. Even though the "rough" timing I did sounds good to me (then again, any signs of life from this Volvo excites me), I think proper static timing is called for this time as incorrect ignition timing could also lead to rich running conditions from what I read. Correct fuel pressure is also critical as higher than normal fuel pressure also leads to running rich. I'll take on these two tasks next weekend as I need to consult my horoscope and purchase a fuel pressure gauge.

While messing around with the crankcase hoses checking for vacuum leaks, I noticed that the hose from the oil filler cap to the intake manifold had some mayonnaise like residue in it (pictured above). Not sure if this is normal. What is this stuff ... engine pus? In any case, I replaced the crankcase hoses with fresh ones. Some of the crankcase hoses also didn't have hose clamps on the ends and stock photos of the hoses didn't show any on them either, but I clamped all of them up anyway just to be rid of any potential vacuum leaks that might be contributing to the problem.

Crankcase Hose Nipple - Before: Crankcase Hose Nipple - Before Crankcase Hose Nipple - After: Crankcase Hose Nipple - After
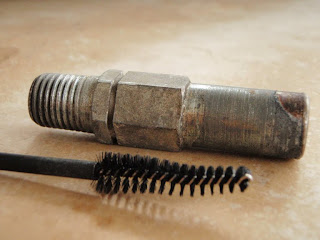
The crankcase hose from the oil filler cap to the manifold attaches to a nipple which I also removed and cleaned as pictured ablove. I used a port brush for a hummingbird feeder to get the insides real good, and flushed out lots of black carbon deposits, and finally finished it off with some light sanding with the rotary tool to get rid of years of surface oxidation. In summary, none of the changes I did today made any difference to the warm engine stalling problem. I'm still checking things off my list, but I have hopes for next week as I attempt to dial in the timing a few notches better and check the fuel pressure.

Oh ... I told myself that I'm not going to be one of those people who name their cars, but after what I had to go through this past few weekends, I've changed my mind and am naming it "Legion" ... for the problems are many.

Saturday, February 27, 2010

PerTronix Ignitor Points-to-Electronic Ignition Conversion - Part 2

I was all ready to perfrom static timing on the engine this morning per the instructions on the "Swedish Enbassy" website when on a whim, I decided to turn the distributor clockwise about 5 degrees just to see what happens. Well ... I lucked-out! I had 50/50 odds of getting it back to its original timing prior to the PerTronix install by turning the distributor clockwise or counter-clockwise. The Volvo roared back to life sounding livelier and "younger" than it ever did as opposed to "tired & grumpy old Volvo." Well, that excitement lasted for several minutes until the engine warmed-up and it was back to a degrading idle and eventually stalling. The good news is, the PerTronix seems to be a promising upgrade ... all I need to do now is solve the warm engine stalling problem.

Having ruled out points as the possible culprit by replacing them with an electronic ignition module, it's time to look elsewhere for a fix. Let's see, so far the following checks have been conducted:

  • Replaced ignition coil
  • Replaced ignition wires
  • Replaced spark plugs
  • Replaced coolant/engine temperature sensor
  • Replaced engine thermostat
  • Cleaned all wiring terminals + grounds
  • Checked cold start valve - no leaks
  • MAPs sensor OK - unhooked the hose to the manifold and sucked on it. Tounge got stuck, so no leaks + pressure held. Resistance checks on terminals also OK.
  • Auxilary Air Valve (AAV) OK - Crimping the top hose dropped the idle when running engine cold. No effect on idle when running engine warm.
  • Air filter OK
  • Replaced points with PerTronix

Next on my list was to check for vacuum leaks and verify that the wiring harness to the Electronic Control Unit (ECU) was ok. While performing a visual check for any possible source of vacuum leaks, I did find a couple of tiny holes in the air intake hose pictured below. Since this hose is north of the intake manifold I don't think it has any effect on the vaccum. I sealed up the holes anyway with a few drops of Gorrilla Glue just for good measure and to prevent unfiltered air from entering the system.

Air Intake Hose: Volvo 1800E Air Intake Hose Holes in Air Intake Hose: Holes in Air Intake Hose

Now that the engine was equipped with a brand new coolant/engine temperature sensor, I wanted to verify that the wiring itself was in good shape, and thus not sending mixed signals to the ECU. I proceeded then to disconnect the Fuel Injection wiring harness from the ECU to perform the electrical checks outlined in this document I found in the Tech Archive of the VClassics Interactive website.

Couple of things I learned from this procedure: Plastic cover for the ECU slides off - do not pry it off like you would a can of paint (see photo below). Referencing the second photo below, pin #1 is on the right (where the red arrow is pointing), or furthest from the bunch of wires enternig the connector. Bottom line is, every single connection was good ... which is fantastic news since I wasn't looking forward to performing surgery on the wiring harness anyways!

ECU Cover Removal: Volvo 1800E ECU Cover Removal ECU Wiring Harness Connector: Volvo 1800E ECU Wiring Harness Connector

Sunday, February 21, 2010

PerTronix Ignitor Points-to-Electronic Ignition Conversion - Part 1

Alright ... same problem, different day. Engine starts & idles fine. Once warmed-up, it idles rough and eventually stalls. I've replaced the spark plugs, ignition wires, installed new thermostat and coolant temperature sensor in the engine block - no difference. The good news is there's only a finite number of possible causes and I've made a list of things to systematically check - it's only in the low hundreds. Among the items on my list are cold start valve leaks, vacuum leaks, MAPS sensor, fuel pressure, etc. There's also some suggestion on the forums that the gap on the breaker points may be closing down. Thus, being the last item on my list, and knowing my luck - it usually is the last thing that I'd check that's the culprit, I decided to skip all the other checks on my list for now and head straight for the last item on the list in an attempt to alter destiny.

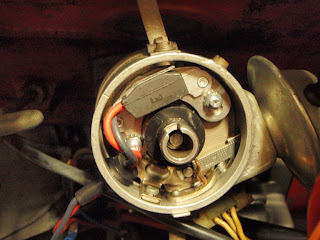
Since I was already planning to perform a points-to-electronic ignition conversion and already have the PerTronix Ignitor module on hand, I decided to perform the upgrade which would eliminate the points & condensor ignition altogether, and hence any problems attributed to faulty points. Having spent a considerable amount of time on the forums trolling for installation notes specific to the Volvo 1800E with current sensing tachnometers, I was able to piece together shards of information into the following 2 wiring diagrams drawn up by my 3 year old daughter using crayons. Ok ... so I did do the drawings myself. The diagram on the left is how the stock wiring should look like for 1800E models. The one on the right is how the PerTronix module needs to be wired to get the current sensing tachnometer to work. My car does not have a ballast resistor going to the coil, so this implementation is specific to my set-up. Really simple - red PerTronix wire goes to ignition coil positive. Black PerTronix wire connects to white tach wire (or faded white on 40 year old cars!). The red PerTronix wire was not long enough to reach the coil on my car, and the black wire was way longer that it needed to be for my set-up, so I trimmed the black wire down and used the remains to lengthen the red wire for my specific application.

Stock Wiring diagram: Volvo 1800E Stock Ignition Wiring PerTronix Wiring Diagram: Volvo 1800E PerTronix Ignitor Wiring

The PerTronix installation walks you through removing the distributor cap, rotor, and points, followed by the installation of the module, and finally threading the wires through the distributor housing. Fuhgettaboutit! Save yourself the trouble - after removing the rotor and points, thread the wires through first before installing the module! Pictured below is the problematic somebitch! Attempting to thread the rubber grommet from the Pertronix module through the tiny hole (left by removing the condensor wire) from the inside of the distributor is an exercise you don't want to go through! If you follow PerTronix's instructions and install the module first before threading the wires and rubber grommet through, you'll find that there's not enough wiggle room to work the thing. In addition, the terminals on the PerTronix wires has barely enough room to clear the hole in the distributor housing. Not impossible - it's just a tight fit. Best to deal with it first before installing the module.

Problematic Somebitch: PerTronix Ignitor Electronic Ignition Module Wire Terminal Thru Distributor Housing: PerTronix Ignitor Wire Terminal

Here's how I did it: Remove the rubber donut completely. Thread it off the PerTronix wires and set it aside, but leave the coned-shaped other half attached to the wires. Next, thread the wires through the distributor housing (from the inside of the distributor of course). Apply dielectric grease all over the rubber donut ... inside the donut hole, inner lip, etc. The dielectric grease is just there as a lubricant to get the donut into the hole ... you can wipe off the mess later. Finally, thread the donut back onto the wires and ease it into hole of the distributor housing. I find that it's much easier to work with the rubber donut from the outside of the distributor. Apply pressure with thumb while slowly rotating the donut to get it to slip into the hole. Once inserted, thread the rest of the wires and the coned-shaped grommet through the hole in the donut to form a tight seal. You're done - follow the rest of the PerTronix manual to complete the rest of the installation.

Installing PerTronix Rubber Grommet: Installing PerTronix Rubber Grommet PerTronix Rubber Grommet Installed: PerTronix Rubber Grommet Installed

Although I do realize that it is necessary to reset the timing after the PerTronix installation as the triggering points are different for points vs. electronic module, I was hoping that the "old" timing would be "close enough". That way (assuming that this upgrade took care of the stalling problem), I would be able to drive to my mechanic and have the professionals adjust the timing with their fancy equipment. Boy, was I wrong! Timing was way off! The engine would barely stay running. Everything else worked fine - starts fine, and the tachometer works, indicating that the install was correct. All that is needed now is to adjust the timing .. which I'll save for next week's challenge.

Before: Volvo 1800E Stock Points & Condensor Ignition After: PerTronix Module Installed

I found an article on static timing a B20 engine on the Swedish Embassy website, which should prove useful for next week's challenge. I tried reading it briefly, but I think I broke a couple of my teeth in the process. I'll have to give it a thorough read this weekend ... right after I figure out what's TDC, what's 16 degrees BTC, what's a crankshaft, what's a timing cover, and what do timing marks look like or where to find them.

Saturday, February 20, 2010

New Thermostat & Engine Sensors

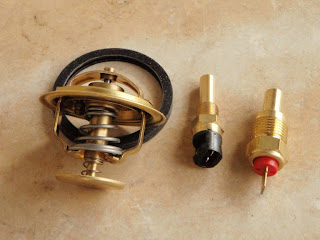
Well ... it's another weekend, and I'm back to troubleshooting my "warm engine poor idle followed by stalling" problem. Suspecting a bad coolant temperature sensor for the D-Jet EFI system, and not knowing the exact range of resistance values for a good sensor across a wider range of temperatures beyond the 50F - 104F outlined in the 1800E Service Manual (the "Green Book"), I had no other option but to order a new part. Besides, installing a new coolant temp sensor or removing the old one for testing would require draining coolant from the engine anyway, and because having new parts is waaaayyy better than money in the bank, I decided to replace the thermostat and the sender for the coolant temperature gauge as well.

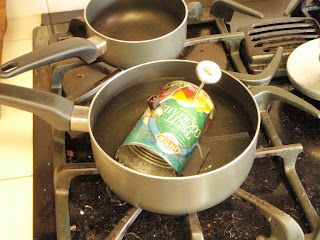
Armed with a new and old coolant temp sensor, I took the opportunity to do some bench testing in the kitchen to satisfy my own curiosity. Drilling 2 holes in an empty food can, one for the sensor, and one for the food thermometer (classy ... I know!), I was able to submerge the contraption into a pot of water and take resistance readings with my multi-meter while slowly bringing the water to a boil. Results are as follows:

TempNew SensorOld Sensor
80F2000 ohms2500 ohms
90F1400 ohms1800 ohms
100F1000 ohms1400 ohms
110F1000 ohms1200 ohms
120F800 ohms1000 ohms
130F800 ohms800 ohms
140F600 ohms600 ohms
150F400 ohms500 ohms
160F350 ohms450 ohms
170F350 ohms400 ohms
180F260 ohms350 ohms
190F260 ohms300 ohms
200F250 ohms250 ohms

New Thermostat & Engine Sensors: Volvo 1800E Thermostat, Coolant Temperature Sensor, Coolant Temp Gauge Sender Testing the Coolant Temp Sensor: Testing Resistance of D-Jet Coolant Temperature Sensor

I began taking readings at room temperature water (80F according to the food thermometer) ... obviously a well calibrated instrument! You can count on those numbers ... trust me, I'm a lawyer! Anyway, although, the new and old sensors have different resistance values at the same temperatures, the one shared trait is that the resistance values do drop at increased temperatures. Not entirely sure if they need to hit an exact resistance value "on the money" at a given temperature or just be "within range", there's no way from looking at the table above for me to tell if the old sensor was really "bad" as I originally suspected. I say "originally", because installing the new thermostat and coolant temp sensor did absolutely nothing to change the running conditions of the engine - hence the old sensor should still be good ... unless it's the wiring from the sensor to the Electronic Control Unit (ECU) that's crap - I'll have to check that at a later time.

Acknowledgements:
  • Parts were purchased from iRoll Motors.
  • Funds for this failed attempt at engine diagnostics provided by Union Bank of California.
  • Food can provided by Hi-Top Fruit Cocktail
  • Food thermometer made in China.
  • Multi-meter also made in China.
  • This site was tested on animals. They didn't get it either.

Wednesday, February 17, 2010

Battery & Starter Follow-Up

Here's a follow-up to the no-start problem I was having until last weekend (now fixed): I found this excellent article about Battery & Starter Problems on the VClassics site today when I was supposed to be working. It goes into detail about the voltage, current, resistance, and what happens when you crank the starter. Basically information that I could have used a couple weeks ago.

Monday, February 15, 2010

Throttle Position Switch

Following-up on a lead that I read somewhere on the forums regarding a dirty Throttle Position Switch (TPS) leading to erratic idling and engine stalling, I decided to give my TPS a thorough cleaning to see if that solves my engine problem ... or at least eliminates the TPS as the source of the problem. At present, I'm not entirely sure of the mechanics of how it might contribute to the issues I'm having as I read about it late at night while I was half asleep, but detaching the plastic cover revealed some black scuff marks on the contacts as indicated by the red arrow in the first photo below. This was easily rubbed out with electronic contact cleaner and q-tips, followed by light dusting of the entire unit with the Dremel rotary tool with the soft bristle brush attachment.

Before: After:

Nope - didn't change a thing. Engine still starts up and idles fine until it warms-up, then it starts idling erratically and stalls. I didn't think it would work anyway since the symptoms are obviously heat related. I have my money on the coolant temperature sensor for now as the Fuel Injection Control Unit relies heavily on this very sensitive piece of equipment. Testing the resistance of the temperature sensor with a cold engine yielded a reading of 3000 ohms (within specs at 65 degrees room temperature). I took another reading when the engine was hot (after letting it run for a while until it stalled), and I got 0 ohms. I'm not entirely sure if its supposed to go all the way down to 0 since none of the resistance charts that I've seen for the temp sensor bother to show that range. Based on those readings, it does seem that the temp sensor is working like it ought to. However, it didn't occur to me while I was performing the test to see how quickly it reached 0 ohms. I'll do that this weekend, starting and stopping the engine at 1 minute intervals and then taking resistance measurements to see if I get a range of values.

Sunday, February 14, 2010

It's Alive!!!

Yup, the battery was at 85% of it's full charge. Took it to the AutoZone store this morning to have them charge it, and it's now registering 12.6 volts. Bench tested the new starter again with only the battery hooked-up and it spun each time. Reattached the starter to the engine, and the car fired right up! That little 1v or so sure made a huge difference! Now that the no-start problem has been solved, it's back to the original problem that started this whole mess - the engine idles ok, but when it warms up, the idle becomes erratic and I'll have to keep tapping the gas pedal to keep it from stalling. Once stalled-out, it takes a few tries to get it going again .. or sometimes not at all unless everything cools down.

The following series of 3 videos demonstrates the current running condition of my 1800E. The first video is the sound of the new Bosch permanent magnet starter in action. The 2nd video is the engine idling normally right after ignition and while it's warming up. The 3rd video is when the engine is all warmed-up and things start to head down the toilet.

Sound of New Starter:
Idling Normally:
Erratic Idle After Warm-Up:

Saturday, February 13, 2010

New Starter

My new starter finally arrived from http://www.rockauto.com/ ... well "refurbished", since they don't make new ones anymore. It's the newer style Bosch permanent magnet starter and it's a later production part than the stock starter on the P1800s. Originally for the Volvo 240s, this "newer style" starter will fit the P1800s. For those interested, just do a search at rockauto.com for part no. SR37X. The new starter has the exact terminals and mounting as the stock starters, but that's where the similarities end. The mounting holes for the 2 bolts are threaded, unlike the stock starters. I've heard that there's a chance of receiving one that is threaded metric. I was prepared to drill out the threads in case I got one of those, but I lucked-out and was able to use my original bolts to install without any modifications. As seen in the photos below, the new starter is smaller in diameter than the stock starter, and is much lighter. It also has internal gears that spin it real fast thus requiring less cranking amps and produces 3hp vs. the 1hp on the stock starters. All pluses in my opinion!

The week prior, while in "staging mode" waiting for the arrival of the new starter, I had spent the time cleaning all the electrical connections leading to and from the starter as well as removing the ground strap (passenger-side undercarriage) and cleaning it proper for this week's install. Switching out the starter was an easy enough job ... just an hour or less. What took more time was working up the courage to get under the car after jacking it up on jack-stands! I rocked the Volvo back-and-forth, sideway, and in every imaginable way while it was up on stands all while contemplating if the 40 year old jacking points would cave in and crush me while I was under the damn thing. After more than an hour of contemplating my life and prophesying my death, I had a meal, smoked a cigarrette, paid all my bills, fed the fish, dog, and cat, and went for it.

Bosch Permanent Magnet Starter: Bosch Permanent Magnet Starter SR37X New vs. Stock Starter: New vs. Old Starter

Guess what? It didn't work! New starter installed ... turned the key in the ignition ... a click ... then nothing! There was a slight improvement over the old starter at this point. I could hear the click of the starter solenoid engaging this time. What could it be? Checking the voltage on the battery positive lead to the starter while cranking yielded about 3 - 4 volts - not good! Whereas a slight drop in voltage is normal when cranking, that much of a drop seems unusual. Am I grounding-out somewhere? Is my ignition switch bad? (Not good, as a replacement would be hard to find!) Did my engine sieze-up? (definately not good!) My head was spinning at this point. More prophesying and fortune telling went on until I came to accept the fact that my day was crap already so why not remove the starter, isolate it from the engine and bench test it with just the car battery hooked up.

Not Funny!!! Not Funny! Bench Testing New Starter: Bench Testing New Starter

Second time around, I figured out how to pull the starter without jacking the car up. Lying flat on my back, I was able to reach under the car from the driver-side with my monkey arms and undo both mounting bolts with a socket wrench. Cool - I'm not getting crushed today! Not how I want to go anyways ... pinned under a 2000lbs Volvo! Not my style ... has to be in a blaze of glory ... big production.

With the battery positive lead attached to the starter's main terminal, and a piece of wire to ground the starter body to the engine, I used 2 more wires to "hot-wire" the starter via the ignition wire terminal on the starter and the starter's positive terminal (watch out for sparks). Detached, from the engine, the starter spun this time indicating that it is indeed working, and the problem is elsewhere. I was only able to get the starter motor to turn on once while bench testing ... which leads me to believe that the battery doesn't have enough juice to power the thing. Checking the battery last week yielded 12 volts though, and another check today yielded between 11 and 12v - which seems to me like a full charge on a 12v battery right? Maybe it's supposed to be 12v while under load? I'll take the battery to the local AutoZone store tomorrow morning to have it charged. They do it for free. Then we'll go another couple of rounds tomorrow. Things are looking up though ... there's hope!