Showing posts with label Seats. Show all posts

Saturday, October 3, 2009

Rebuilding Rear Seat Frame - Part 2

Finally! After hours of labor polishing the old clips and mounting hardware with the rotary tool and fabricating seat webbing out of new Pirelli webbing, the rear seat frame rebuild is done and back in the car! I don't know why I even bothered since no one will ever see it and there's no way anyone can fit in the back seat.

Seat Frame with Pirelli Webbing:
Finished Seat Frame Reinstalled: All the Hard Work Hidden ...

Saturday, September 26, 2009

Rebuilding Rear Seat Frame - Part 1

What started as a simple 2 hour task of replacing petrified seat webbing is turning out to be a two weekend long project! Having lost their elasticity decades ago, the webbings for the rear seat frame were stiff and crumbled to the touch. Replacing them is simple enough as the seat webbing (or Pirelli webbing) is widely used by the furniture and upholstery industry, and therefore easily attainable. Upon removing the rear seat however, I discovered some minor rust spots on the seat frame and decided to take the opportunity to address those while I had everything apart.

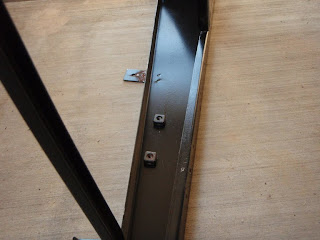
Seat Frame Before Restoration: Rear Seat Frame - Before Restoration Retainers for Mounting Screws: Seat Frame Showing Retainers

The preparation process involved removing the entire rear seat frame from the Volvo, removing all 4 rusty retainers so that they could be rust treated separately with the rotary tool, sanding away all rust flakes, and sanding down the smooth paint to provide a coarse surface for the rust preventative paint to adhere to.

Retainers - Before & After: Retainers - Before & After Backyard Paint Shop: Backyard Paint Shop

Next, the seat frame was cleaned and degreased with Marine Clean, followed by an application of Metal Ready on bare metal to chemically etch the surface for proper adhesion of the rust preventative paint. Two coats of POR-15 rust preventative paint later, and this seat frame should not rust again ... ever.

Before: Seat Frame - Before POR-15 After Seat Frame - After POR-15
Seat Frame - Before POR-15Seat Frame - After POR-15

As I did not have enough time to complete the rebuild, I'll be working on fabricating the new seat webbing and reinstalling the rear seats next weekend.

Saturday, July 25, 2009

Seat Restoration

Step 1: Remove Cat. Remove catStep 2: Remove Seats.

Step 3: Remove Seat Mounts. This is what 38 years of gunk looks like! Upon removing the seats, I discovered the condition the seat mounts were in! They were in working condition, but covered with a thick layer of grease and dirt. Although easily out of sight once the seats were put back in, my OCD was kicking into gear and I just had to do something about the mounts. I discovered that white lithium grease works great as a solvent to clean and polish up the steel parts.

Step 4: Recondition Seat Mounts. A couple of episodes of lion chasing antelope on the Discovery channel and 4 beers later, and the seat mounts were looking a whole lot better.

Before: Seat Mounts - BeforeAfter: Seat Mounts - After

Step 5: Recondition Seats. This process involved the use of Lexol's leather cleaner and leather conditioner to clean the seats and to restore the oils originally used in the tanning process. This stuff works great! The leather feels fresh and softer to the touch after application. Although difficult to tell from the following photos in their reduced size (click to enlarge), all the old oxidized bolts attaching the seat to the seat frame were also removed and replaced with brand new stainless steel bolts ... which were easily attainable from the local ACE Hardware store. All the chrome parts also got a good polishing to restore their original shine.

Before: Seat - Old BoltsAfter: Seat - New Bolts

Step 6: Reinstall Seats.

Volvo 1800 Seats - After Conditioning
Step 7: Reinstall Cat.Reinstall cat