Showing posts with label chrome. Show all posts

Saturday, June 26, 2010

New Quarter Window Seals

After almost a year since I purchased a pair of new quarter window seals from iRoll Motors, I finally worked up the guts to tackle this project. I've been spending lots of time researching a) how to remove the old dried-up rubber seal without breaking the windows, and b) how to install the new seals. Turns out, it wasn't that difficult at all! The first challenge of removing the old rubber seal was simple. Mine were so weathered and brittle, they just broke off when peeled by hand. Anyone attempting this should take note that the rubber seal is the only thing holding the quarter window glass in place, so make sure you hold on to the glass!

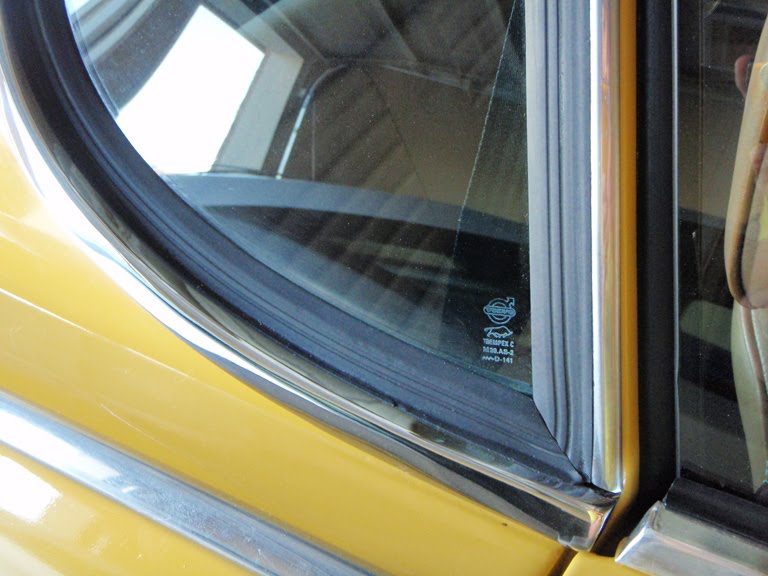
The second challenge was even easier ... I paid the local auto glass shop $40 to install the new ones. After reading countless articles and forum posts on using the "rope technique", and perfecting the manuever in my mind, I decided to have the professionals do it for me. Here are the before and after shots:

Before: Quarter Window Seal - Before After: Quarter Window Seal - After
Before: Volvo 1800 Quarter Window Trim - Before After: Volvo 1800 Quarter Window Trim - Aftrer

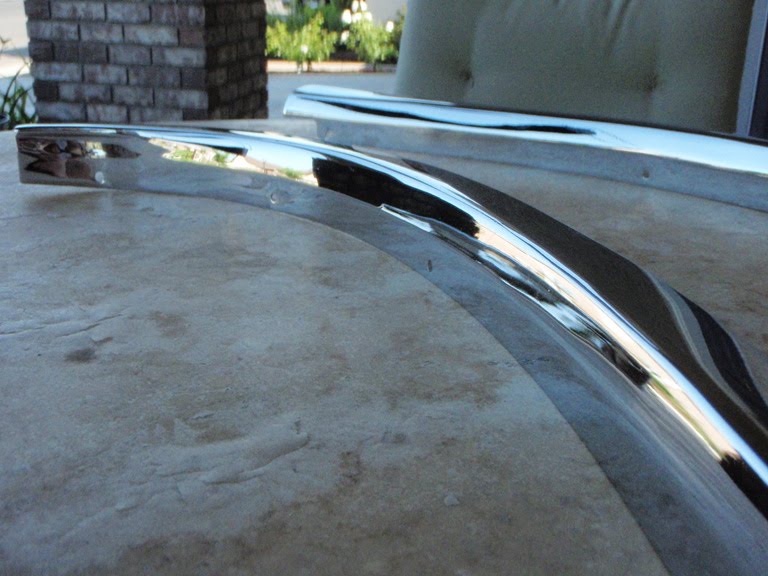
While I had the glass off, I took the opportunity to have the quarter window trim pieces re-chromed. Notice, the "before" photos show the black residue left from the old dried-up rubber seals. I got these off using what else? ... but another tool from the kitchen - a bamboo skewer. Yes, the same kind used for shish-kebab and barbeques. They're hard enough to scrape the dried rubber off, but more importantly, they won't scratch the surface of the trim.

Quarter Window Trim - Before: Volvo 1800 Quarter Window Trim - Before Quarter Window Trim - After: Volvo 1800 Quarter Window Trim - After
Volvo 1800 Quarter Window Trim - BeforeVolvo 1800 Quarter Window Trim - Rechromed

The "rope technique" of installing the window and the new seal obviously requires some finess ... a word that is not in my vocabulary. The way it works is as follows: The rubber seal goes arond the glass first. A length of rope is then inserted between the glass and the lip of the seal. The whole thing (rope, glass, and seal) then goes into the window opening. Rope is then pulled, thereby pulling the lip of the rubber seal outwards to form a seal against the body of the car.

My advice: pay the local auto glass shop the small amount of cash, sit back, and have them perform the rope trick for you! They'll even seal the windows with that black waterproof stuff as part of the install. Here are more before-and-after photos of the trim pieces after I had them re-chromed and reinstalled:

Quarter Window Trim - Before: Quarter Window Trim - Before Quarter Window Trim - After: Quarter Window Trim - After
Quarter Window Trim - BeforeQuarter Window Trim - After

Here's a photo of the bamboo skewer used to scrape the old dried rubber from the quarter window glass. Bamboo skewer + Windex (or some other glass cleaner) = no dried rubber + no scratches! As for this last photo of the truck ... the place that I go to, to have my stuff rechromed is in some back alley in a dodgy part of town. This place doesn't even have proper business signage. Every time I have to make an appearance, I feel like I'm either going to get mugged or made into some transient's bitch. Anyway, the owner of this five-star plating establishment is always in a foul mood. He's this old timer who looks like a salty old sailor or Captain Ahab, has a permanent scowl on his face, never speaks unless spoken to, and when he does, it's alway gruff and in short sentences. I've always tried to be warm and friendly to the guy, even tried breaking the ice a couple of time ... but nothing ... no love ... you could hear crickets chirping in the background. I'm now pretty certain that he doesn't just wear his "grump on" just for me. On my last visit I took this picture of his truck. Click on the photo to view it enlarged and take note of his license plate.

Bamboo skewer to remove dried rubber: Volvo 1800 Quarter Window Glass Mr. Grumper's Truck: Mr. Grumper's Truck

Saturday, April 10, 2010

Purring Like A Kitten!

I got the Volvo back from the shop earlier this week and it's purring like a kitten! Erratic idle - gone! Engine Stalling - gone! Running rich - not anymore! I took it to a shop in town called British Steel Restorations. Rick Rogers, the proprietor, and a former helicopter mechanic specializes in the restoration of classic British automobiles. I figured, if he can fix helicopters, he'll surely be able to fix the Volvo! I've known Rick for a couple of months prior to taking the Volvo in for work ... having sought him out, and set up a couple of meet-and-greets to tour his facility, evaluate his work, and more importantly, to lure him to the dark side by coercing him to temporarily abondon his staple of fine British classics to work on my Volvo as it surely has enough British components in it to qualify. It does - Smith gauges, Lucas electrical components, Laycock De Normanville overdrive is similar to the TR6 or 7 models, etc.

Are there any other places in town to take the Volvo to? Sure, but I'm extremely particular when it comes to people working on my car as I don't want it to be molested by any regular mechanic with a socket wrench. It has to be someone who is also a collector, who specializes in vintage vehicles, who will handle my Volvo like they would a radioactive fuel rod. Hence, the many months of research and interviews for just the "right" mechanic. There are Volvo dealerships that I could have taken it to, but I doubt that they still employ the guys that were around when the 1800s were still on the market. Plus, they usually don't let you "hang-out" and watch while they work on your car - where's the fun in that? Anyone who no speaka ingrish - is automatically disqualified. Shops that won't allow me to bring in my own parts were also disqualified (it's a sign that they'll mark-up the parts that they'll undoubtedly need to source from a third-party). Mechanics with a low teeth-to-tattoo ratio were also disqualified (different though if you need radiator work done - you'd want the biker guys with the low teeth-to-tattoo ratio, as they really know their shit!).

The main reason for the visit was to have the Volvo complete its tune-up with an oil change, valve adjustment, oil filter replacement, and have Rick verify with his instuments all my prior adjustments to the idle richness, timing, idle & throttle settings. The stuff that I messed with were all pretty close, but we (by "we", I mean "Rick") did it again with instruments this time to get them within factory specs. Turns out, all the valves needed adjusting - which is most likely the cause of the erratic idling and engine stalling. With everything dialed in to specs, the engine is running much quieter and better than its ever been since I've had the car!

Arrival at British Steel Restorations: 1971 Volvo 1800E Chromed Valve Cover & Oil Cap: Volvo 1800 Chromed Valve Cover & Oil Filler Cap

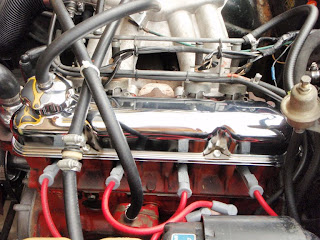
Pictured above, on the right, is the chromed valve cover & oil filler cap that I stole off eBay about 8 months ago. I've been itching to get it on the engine ever since, and now the opportunity has presented itself with the removal of the old valve cover for the valve adjustments. Pictured below are the before-and-after photos of the engine bay with the old vs. chromed valve cover in place. Take a closer look at the chromed valve cover and you'll see the valve cover hold-down kit that I got from IPD. These valve covers are prone to distortion from overtightening the mounting screws. This leads to improper sealing and oil leaks. The hold-down kit spreads the clamping force over a larger area, allowing the gasket to better seal against the cylinder head.

Before: B20 Valve Cover - Before After: B20 Valve Cover - After

Another thing that I had done while the car was in the shop was the replacement of the rubber steering coupler. Mine had a few tears in it. It is a part that is often overlooked when purchasing a vintage vehicle, but is crucial as you will lose the ability to steer if it comes off! I also instructed Rick to take a good look at the entire vehicle to identify anything that might affect drivability or safety that needed replacing. He found one - the driver-side tie rod was "barely" hanging on and it was promptly replaced with a brand new one from IPD. Other than that, Rick's report was very encouraging - everything under the car looked solid, no rust on the floor pans or cross members. The car is mechanically and structurally sound. The rest is just appearance items or aged parts that currently do not affect the drivability or safety of the vehicle and can be swapped out at my leisure.

I also had Rick perform a compression check on the engine just for the heck of it, and the results for each of the 4 cylinders were well within the range for an engine of its age, and the variances across cylinders were within norm (I don't have the test result on hand right now, and it's all greek to me anyway - all I know is he says it's all good, so I'm driving it across the Atlantic). At one point Rick even had a scope down the fuel tank and was happy to report that it looked like it was in great shape and the outbound fuel was clean. Good news for me, as it's one less thing to restore!

Before: Volvo 1800E Engine Bay with Old Valve Cover After: Volvo 1800E Engine Bay with Chromed Valve Cover

ZDDP - I read somewhere that it's good for flat tappet engines (here and here, I think!). Unfortunately modern engine oils no longer have it, but here's an additive that I bought from iRollMotors.com called ZDDPlus (picture below, left) that can be added to the engine at each oil change. I also found out later that Valvoline VR1 20W-50 motor oil still has the appropriate levels of the stuff, so that'll be the oil I'll be using in the future with no need to spend the extra $10 for the ZDDPlus additive.

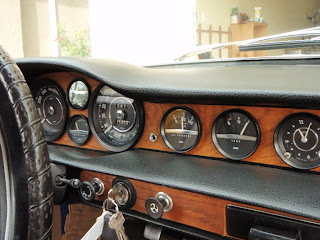
ZDDP Additive: ZDDP Additive Instrument Cluster: Volvo 1800E Instrument Cluster

Ever since I've had the Volvo, the following instruments on the dash were not working: Oil temperature gauge, fuel gauge, turn signal indicators on the dash would only flash once, and the emergency brake warning light on the dash would stay lit all the time the car was running. The gauges were in working condition, just the wiring (or in the case of the oil temperature gauge, the sensor) needed some attention. Well ... the oil temperature gauge was a simple fix. Installing a new oil temperature sender during the oil change solved that problem. As for everything else ... heck of a lot easier as it turns out! The brake warning light first of all has a dual purpose - It lights up when the the emergency brake is engaged when the engine is running, and it lights up when there is unequal pressure in the brakes as sensed by a switch in the engine bay. Neither of which applies in my case as I'm aware that the previous owner had some electrical work done by his mechanic which resulted in 2 things happening - the warning light being lit all the time, and the fuel gauge stopped working. This is where the giant colored wiring diagram I purchased a couple weeks ago proved useful. It seems that the previous mechanic got creative with one particular wire in the dash, and upon removing the "stray wire", everything on the dash started working! I mean everything ... the fuel gauge works perfectly now and it is accurate (we tested). The brake warning light works like it should. Even the turn signal indicators on the dash started behaving - they flash continuously until disengaged. Bonus! I'm crossing off a bunch of stuff from my to-do list with one pull of a wire!

Saturday, January 16, 2010

PerTronix Flame-Thrower & MSD Wires Installed!

Lots and lots of dielectric grease is what you'll need for building custom spark plug wire sets! The boots are almost impossible to thread through unless they're lubricated with a generous amount of dielectric grease. The spark plugs I ordered didn't show up for this weekend's party (they're on backorder), so I still can't tell if any of these replacements will solve the "no start" problem. The plugs that I currently have in the engine have the old school styled terminals which do not fit the plug terminals on the new wires. Besides, the old spark plugs looked pretty fouled, so I hope that's the extent of my problem. Here's the before-and-after photos of the wire upgrade. I'm still not sure how I feel about the new wire set. I like the look of the red wires, but at this point I much prefer the cleaner look of the stock boots on both the spark plug and the distributor end. The grey colored oversized MSD boots might take a while getting used to, however they are built that way to take a pounding from the engine heat and oils. BTW - These wires really do have low resistance! I checked them with a multi-meter and they really do only produce 40 - 50 ohms of resistance per foot, which translates to greater efficiency in the transfer of energy to the spark plugs.

Stock Spark Plug Wires: Volvo P1800 Spark Plug Wires - Before MSD 8.5mm Super Conductors: Volvo P1800 Spark Plug Wires - After

I also replaced the stock Bosch ignition coil with the PerTronix Flame-Thrower coil which adds another chrome element in the "looks" department of the engine bay. The photo below shows the new coil with new red coil wire that I built using the same MSD 8.5mm wire kit used to build the spark plug wires.

Stock Ignition Coil: QEM Bosch Ignition Coil PerTronix Flame-Thrower Coil: PerTronix Flame-Thrower Coil

Sunday, December 13, 2009

Engine Bay - Red & Chrome!

I took it easy this weekend. No major overhaul, just slowly reinstalling components that have been worked on the weeks before back into the engine bay. In order to get the heater back into the car, everything else that I removed has to be reinstalled in reverse order, starting with the repainted radiator fan and the chromed fan-belt pulley. The newly polished water outlet pipe was also reattached to the engine block.

Radiator Fan + Pulley - Before: Radiator Fan + Pulley - Before Radiator Fan + Pulley - After: Radiator Fan + Pulley - After
Radiator Fan + Water Outlet Pipe - Before: Radiator Fan + Water Outlet Pipe - Before Radiator Fan + Water Outlet Pipe - After: Radiator Fan + Water Outlet Pipe - After

Here's the front view of the red radiator fan and a bird's eye view of the engine compartment showing the freshly painted battery support arm.

Repainted Radiator Fan: Repainted Radiator Fan - Front View Reinstalled Battery Support Arm: Reinstalled Battery Support Arm

Saturday, November 21, 2009

Chrome!

I just got back some pieces from the electro-plating shop. Since I have the radiator out and a clear shot at the fan and pulley system, I decided to yank those out to have the fan re-painted and the fan-belt pulley chromed. Pictured below clockwise from top is the water outlet pipe from the engine to the radiator, spacer between the fan and the pulley, and the fan-belt pulley. Both the water outlet pipe and the spacer are made of aluminium, and therefore cannot be chrome plated. The shop polished them the best they could instead. The fan-belt pulley however ended up with 4 layers of plating: 2 layers of copper, followed by nickel, and finally chromium. This thing looks like a piece of jewelry now ... I'm considering not putting it back on the engine and wearing it around my neck instead! The cowl intake grille is another piece that is made of aluminium, but the polishing process rendered it looking as good as chrome anyway. All of these were done for $60 - Not bad Kimosabe ... not bad.

Engine Components - Before: Engine Components - Before Engine Components - After: Engine Components - After
Cowl Intake Grille - Before: Cowl Intake Grille - Before Cowl Intake Grille - After: owl Intake Grille - After