Saturday, August 22, 2009

Rear Reflectors

It's funny guys ... as kids, we used to remove the reflectors from our brand new bicycles because they looked dorky. Now, I find myself putting back the reflectors on my car because they look retro cool! So anyways, round rear reflectors were MIA from my Volvo. I didn't even realize that any were supposed to be there (they're an accessory) until I saw some photos on the web of 1800s with them ... and of course I had to have them! The parts were sourced from Mike Dudek at iRoll Motors Inc - 2 mounting brackets (used), and 2 brand new round reflectors. Now, when I say "used", I'm using the term loosely, because what arrived were a pair of rusted scrap metal that used to be mounting brackets. So it's out with the rotary tool to see some sparks flying. I was actually itching for an excuse to fire up the rotary tool anyway!

Several sanding and grinding bits later and the mounting brackets were ready for a couple of coats of POR-15 rust-preventive paint. Highly recommended among the restoration community ... coat your car in enough of this stuff and it'll float in the open sea without rusting! Rubber gloves and proper ventilation is in order here when applying this stuff because side-effects of inhalation may cause all 4 kinds of mental retardation, anal leakage, speech impairment, you know ... all the greatest hits.

Here are the before-and-after photos of the reflector install. What do you think? Retro or not?

Sunday, August 16, 2009

Mud Flaps

This weekend was spent installing rear mud flaps on the Volvo. I'd been sitting on the parts for about a week, slowly gathering up the courage to drill the necessary holes into the rear fenders. Having seen a few photos of the 1800s with mud flaps on the web, I was determined to give my Volvo the same treatment as nothing shouts "retro" like mud flaps! The original mud flaps were missing from my car because they were a dealer installed accessory at the time of purchase and I guess the original owner was too cheap to spring for the $1.49 each back in the 70's.

Before Mud Flaps:

As with any other project, I always emphasize safety first. Installing mud flaps involves jacking-up the rear-end. Hence, the front-end should be secured with parking blocks, bricks, or a cat. Any species would do. They are a universal fit. I used my neighbor's cat in this case. Aside from the stainless steel mounting brackets and the original Volvo mud flaps which I secured from Mike Dudek at iRoll Motors Inc. for $16.95 each (inflation), the only other tools necessary to get the job done were a jack, power drill, brand new stainless steel screws, nuts, and washers from the neighborhood ACE Hardware store, and this handy little bubble level (pictured below) that was included with the mounting hardware from some wall shelves that I bought from Pottery Barn. I thought they were cool, so I kept them thinking they might come in handy someday. Mike Dudek is a nice guy to work with by the way ... very helpful. I will continue to give him my money.

Improvised Parking Block: Parking BlockBubble Level: Bubble Level

Afixing the bubble level to the mounting bracket with some tape, I used it to center the position of the bracket to the inside of the rear fender, so that the brackets don't get attached cock-eyed. There is a difference between the driver and passenger-side mounting brackets, so care has to be taken to make sure that each is mounted onto the appropriate fender. Pictured below is the driver-side rear bracket with the mud flap already attached.

Rear Driver-Side Mud Flap:

According to the official Volvo P1800 Mud Flap Installation Instructions, the bracket is installed at a distance of 56mm (2.2 inches) from the base. In reality, this should only be used as a "loose" guide as the actual placement is at whatever height that the mounting bracket can successfully come in contact with both sides of the wheel well at the same time! Once the positioning is determined ... start drilling. Here are some before-and-after photos of the Volvo after mud flap installation. All I need now are some bell-bottom jeans and avaiator sunglasses to complete the "retro" look.

Volvo 1800 Mud Flaps - BeforeVolvo 1800 Mud Flaps - After

All done, and ready for the test-drive! Remember, safety first ... remove cat. Test Drive

Saturday, August 15, 2009

Stainless Steel Wiper Blades

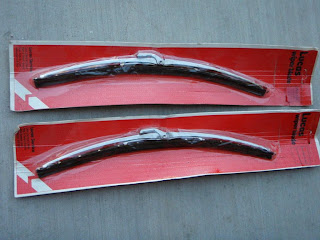
NOS Stainless Steel Trico Wiper Blades

Found a pair of these "New Old Stock" (NOS) Stainless Steel Trico Wiper Blades that were original equipment for '62 - '71 Volvo 1800 coupes. They were purchased from volvosolutions.com and well worth the $90 to restore the Volvo's retro look compared to the modern-day generic black wiper blades. The wiper blades arrived in brand new condition in their original packaging, which is rather rare since the manufacturer went out of business 15 - 20 years ago.

Before: Before - Generic Wiper Blades After: After - Stainless Steel Wiper Blades

Saturday, August 1, 2009

Rearview Mirror

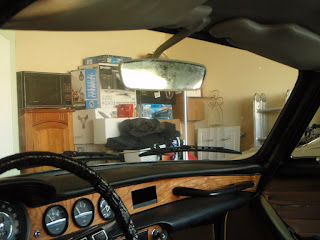
The original rearview mirror was in such bad shape that it was disintergrating before my eyes. Everytime I touched it, some pieces of the white plastic enclosure would fall off. The mirror itself was in no better shape having deteriorated to a point where it's become a safety issue.

Volvo 1800 Rearview Mirror - BeforeVolvo 1800 Rearview Mirror - Before

A visit to ebay and $40 bucks later, scored me this compatible rearview mirror from a Volvo 140. The mirror was in excellent shape, slightly wider than the original Volvo 1800E mirror, hence a wider field of view, and black in color - which matched the black dash better than the original I think!

Volvo 1800 Rearview Mirror - AfterVolvo 1800 Rearview Mirror - After

Problem was, since the mounting base was attached to the roof with 2 screws, and the mirror assembly attached to the base in such a fashion that it concealed the screws, I had no idea how to remove the original mirror or even to attach the new one!

Finally, after sitting in the car for 2 days staring at the thing and breathing in fumes from the WD-40 and grease soaked car parts, I reached the final state of Nirvana, and Buddha spoke to me in the form of Bob Marley - saying "Just grab the mirror by its arm mon, and yank it like you have a pair!" Turns out, the mirror assembly is attached to the mounting base by means of a nut wedged between 2 steel compression rods that ... well, compress when force is exerted between them.

In other words, there's nothing really technical to this procedure. Simply, grab the mirror assembly by the arm and give it a good yank downwards and towards yourself. To install the new mirror - reverse the process.