Saturday, December 19, 2009

Radiator Reinstalled

I was hoping to get all of the heating and cooling components back into the engine bay this weekend, fill the system with coolant and start the engine up, but ran out of time and daylight. What did get reinstalled was the radiator, radiator fan shroud, coolant overflow bottle and mount, and the heater control valve - all with brand new mounting hardware and new hose clamps. At one point, while I was contorting my 6 foot frame under the dash to reinstall the heater control valve, I got my head stuck between the steering wheel and the shifter, and took the opportunity to remove the heater control unit and cables to have them cleaned since they were at "eye level" ... and I was waiting for the fire department to bring the "jaws of life" to dislodge me.

1971 Volvo 1800E Radiator Reinstalled1971 Volvo 1800E Restored Radiator

To my surprise, I found that there's a little 5W light bulb that goes into the heater control housing ... bonus! I know it doesn't seem like anything to get excited about, but the only lights that work in the interior of my car are those from the instrumentation panel on the dash, and the dome lights in the rear which were designed to work manually, or automatically when the doors are opened. Well ... mine don't work when the doors are open (another future project). Manual control works, but I can count that out as it's impractical to reach over to the back seats and flip them on. Anyways, when working, this little bulb is supposed to emit green light (via a green plastic filter in the heater control housing) down on the heater controls, presumably when the headlights are on so you can see where they are in the dark. The bulb looked intact, so I just cleaned the electrical housing and electrical contacts and plugged it back in. I'm not going to get my hopes up as it obviously wasn't working before, and the problem is most likely electrical, but hey - at least I found another non-working light source to add to the collection! FYI - map light aka tiny light bulb under passenger-side dash does not work, interior dome lights don't work when doors are ajar, left & right turn signal dash indicators only blink once when engaged (is this normal?), are there any other interior lights that I don't know about?

Sunday, December 13, 2009

Engine Bay - Red & Chrome!

I took it easy this weekend. No major overhaul, just slowly reinstalling components that have been worked on the weeks before back into the engine bay. In order to get the heater back into the car, everything else that I removed has to be reinstalled in reverse order, starting with the repainted radiator fan and the chromed fan-belt pulley. The newly polished water outlet pipe was also reattached to the engine block.

Radiator Fan + Pulley - Before: Radiator Fan + Pulley - Before Radiator Fan + Pulley - After: Radiator Fan + Pulley - After
Radiator Fan + Water Outlet Pipe - Before: Radiator Fan + Water Outlet Pipe - Before Radiator Fan + Water Outlet Pipe - After: Radiator Fan + Water Outlet Pipe - After

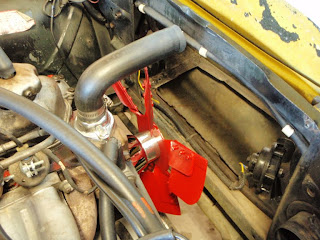
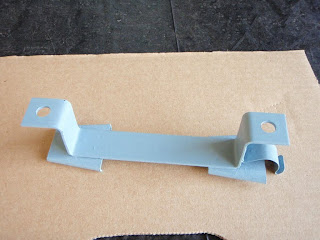
Here's the front view of the red radiator fan and a bird's eye view of the engine compartment showing the freshly painted battery support arm.

Repainted Radiator Fan: Repainted Radiator Fan - Front View Reinstalled Battery Support Arm: Reinstalled Battery Support Arm

Saturday, December 12, 2009

Hood Support

Spent a week slowly chipping away at the hood support with the Dremel rotary tool, a half-hour each night grinding, deburring, and polishing until finally all the dirt and discoloration were gone. I've reattached it to the Volvo today, which means the hood can now stay open, thus paving the way for the rest of the stuff to be placed back into the engine bay.

Before: Volvo 1800 Hood Support - Before After: Volvo P1800 Hood Support - After

Sunday, December 6, 2009

Heater Rebuilt

At long last, the heater box has finally been pieced back together after being removed from the Volvo for almost 2 months! In summary, the entire unit has been sandblasted to remove old paint and rust, coated with POR-15 rust preventative paint, heater core flushed and checked for leaks, blower motor rebuilt, have all hardware replaced, and finished off with new seals and gaskets. Below are the before-and-after photos. Notice in this 1st series of 4 photos, the metal plate housing the defrost outlet has been repainted cast iron grey.

Heater Front - Before: Volvo 1800 Heater Box (Front)- Before Heater Front - After: Volvo 1800 Heater Box (Front) - After
Heater Front - Before: Volvo P1800 Heater (Front) - Before Heater Front - After: Volvo P1800 Heater (Front) - After

This next series of 4 photos show the rear of the heater box. All hardware have been replace with new ones (screws, washers, etc.)

Heater Back - Before: Volvo 1800 Heater Box (Back) - Before Heater Back - After: Volvo 1800 Heater Box (Back) - After
Heater Back - Before: Volvo P1800 Heater (Back) - Before Heater Back - After: Volvo P1800 Heater (Back) - After

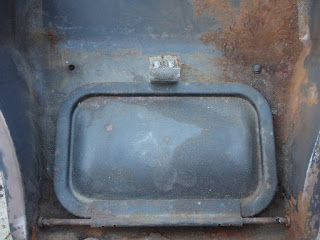
The following photos show more detail work. The first shows the condition of the floor vent (before restoration) from the inside of the heater box. Here you'll notice the rust on the inside walls of the heater box as well as the corroded vent latch. The 2nd photo shows the defrost vent with new seal and restored vent latch. 3rd photo is the same floor vent in closed position. 4th photo shows the new drain tube which diverts any condensation from the heater out of the car via a drain hole in the floor panel.

Heater Floor Vent - Before: Heater Floor Vent - Before Defrost Vent - New Seal: Defrost Vent - New Seal
Defrost Vent - Reconditioned Latch: Defrost Vent - Reconditioned Latch New Drain Tube: New Drain Tube

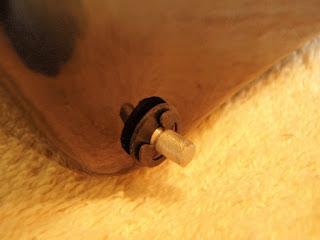
In this final series of photos glorifying the heater box, the 1st shows the heater core being reinstalled. Later, the edges of the heater box was given an application of high temperature silicone gasket maker before the two halves were reattached. The 2nd is of the repainted plastic defrost outlet. The metal plate surrounding the defrost outlet has also been repainted cast iron grey. 3rd photo shows a vent spindle painted in POR-15 silver and reattached with new hardware. 4th photo - shows a new "D" style clamp washer securing the vent spindle on the opposite end.

Heater Core Reinstalled: Heater Core Reinstalled Repainted Defrost Outlet: Repainted Defrost Outlet
Vent Spindle With New Hardware: Vent Spindle With New Hardware D-Style Clamp Washer: D-Style Clamp Washer

Saturday, December 5, 2009

New Colors

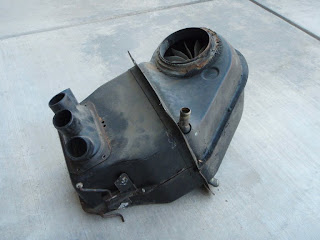
I've got lots of photos to share after spending the entire weekend with a facemask on and a couple of aerosol cans of paint. The first series of photos below are of the air duct which directs fresh air to the heater unit. The color scheme that I've picked for the engine compartment is black, cast iron grey, silver (or light gray), red, with some chrome highlights. The first photo below shows the air duct in its original black color. The second photo shows bare metal after sandblasting. The third is after 2 coats of POR-15 rust preventative paint followed by 3 coats of their tie-coat primer wet sanded down to a smooth finish. The fourth photo is of the finished air duct spray painted in cast iron grey.

Air Duct in Original Condition: Air Duct - Original Condition Air Duct After Sandblasting: Air Duct - After Sandblasting
Air Duct With POR-15 + Primer: Air Duct - After Primer Air Duct With Final Color: Air Duct - Final Color

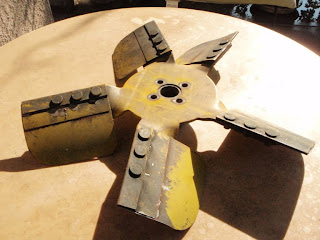
The following series of photos are before-and-after shots of the radiator fan and the support arm for the battery. They've both been sandblasted to remove any rust and old paint, coated with POR-15 rust preventative paint, and coated with primer before the final application of red paint. I think the red accents against the black, silver, and cast iron grey of the other components in the engine compartment will add some dimension to the overall pallette. I call this the "Peacekeeper Color Scheme" from the farscape television series ... it's a sci-fi thing ... nevermind! I'm sure some P1800 purists will be screaming bloody murder because I changed the original color of some of the components - they can call me on this toll-free number to "express" themselves: 1-800-EAT-SHIT. Operators are standing by.

Radiator Fan - Before: Radiator Fan - Before Radiator Fan - After: Radiator Fan - After
Battery Support Arm - Before: Battery Support Arm - Before Battery Support Arm - After: Battery Support Arm - After

This final series of photos depict the process of getting one of these components from its initial banged-up condition to the final painted stage. Pictured below is the mount for the coolant overflow bottle. I meant for this to be painted in POR-15 silver initially and left as is without any top-coat because it won't be seen once the coolant overflow bottle is reattached, but as luck would have it, the silver POR-15 dried up in the can, so I had to work with black instead and top-coat with cast iron grey. After sandblasting to remove the rust, 2 coats of POR-15 were applied (2 hours between coats) followed by 2 coats of their tie-coat primer (which I would never buy again). The first coat of primer was applied 4 hours after the final coat of POR-15, when it was dry to the touch, but tacky with a slight finger drag. I found through experimentation that this is the only way to get that 1st coat of primer to adhere. The 2nd coat of primer was applied 12 hours later (after the 1st coat dried). After yet another 12 hours of curing, the primer was wet-sanded down to a smooth finish. All of this was done days or weeks prior to this weekend's paint job of course, as there is a lot of "down time" involved waiting for stuff to dry and only being able to do one side at the time for most components. The spray painting process is fairly simple. I like to start with 2 very light coats of paint with 10 minutes between each coat. 10 minutes after the 2nd light coat, I then blast it with a medium-wet coat of paint to get that smooth shiny finish.

Coolant Overflow Bottle Mount - Before: Coolant Overflow Bottle Mount - Original Condition After Sandblasting, POR-15 & Primer: Coolant Overflow Bottle Mount - With Primer
With 2 Light Coats of Paint: Coolant Overflow Bottle Mount - 2 Light Coats of Paint Final Coat of Paint: Coolant Overflow Bottle Mount - Final Coat of Paint

Sunday, November 29, 2009

Painting Over POR-15

... was not a rewarding experience! The POR-15 rust preventative paint comes in black, semi-gloss black, grey, silver, and clear. Therefore, if the finished project is to be in any color other than the ones listed, it has to be primed and top coated. Enter "tie-coat primer" by POR-15. This is a special interlocking primer that was made specifically to adhere to cured POR-15. Well not really ... as I found out the hard way! In practice, I found that it does not "adhere" to cured POR-15 ... even after sanding the POR-15 finish! In addition, I had to build on whatever little of the first coat that did manage to adhere to the POR-15 finish with a second, and third coat ... with 12 hours of drying time between coats! What a bloody waste of time! On top of that the whole thing had to be sanded down to a smooth finish before final application of paint. In short, this product does not work as advertised. In fact, the instructions that came with it suggests that the best method for applying the primer over cured POR-15 is to first pre-prime it with their "self etching primer!!!" A primer for the primer? Does not compute! In experimentation however, I did find that the best way to get the tie-coat primer to take, is to slap it on 2 - 6 hours after the final coat of POR-15 - that is before it is cured, tacky with a slight finger drag. The first coat doesn't have to be pretty, just a base to get the second coat on. That way, all you need is 2 coats of the primer instead of the 4 to 10 if attempted over cured POR-15! I should have just gone with their spray on self-etching primer that supposedly works on cured POR-15 too and can be topcoated within 30 minutes. I've had nothing but positive experience with their POR-15 rust preventative paint, but this tie-coat primer really lost some major points with me. Next time, I'll just send stuff to the shop to have them powder-coated right after sandblasting instead of screwing around with this stuff. While struggling to get the tie-coat primer on, I had to fanangle-up this applicator using a piece cut out from a foam brush and some wooden coffee stirrers from Starbucks. This "modified" applicator was used to get primer onto areas not feasible with a traditional foam brush:

Modified Foam Applicator: Folds in Half For Dipping:
A Few Twists to Wring Out Paint: Goes Where No Other Foam Brush Goes:

Saturday, November 28, 2009

Air Intake Grille

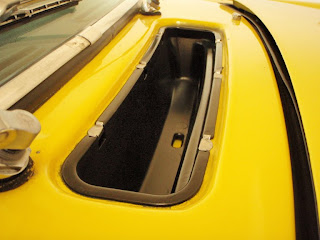
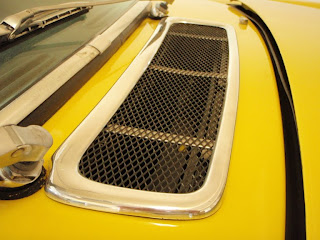
I've been spending a lot of the Thanksgiving weekend painting, priming, eating turkey, watching paint dry, sanding, repeat ... none of it worth any pictures. I thought I had the whole weekend planned out - sanding primer down on some components and spray painting a fresh coat of paint, when a neighbor caught me in the process of sanding and said "You know ... you'll get a much smoother surface by wet sanding that." Huh? Wet sanding? So now I'm back to square one, repriming, and googling "wet sanding." Well, at least I have these photos to put up. Somewhere between the 4th helping of turkey and watching paint dry, I busted out the Dremel rotary tool and went to town on the clips and fasteners for the air intake grille. Both the air intake baffle which has a fresh coat of paint from last week and the polished grille are now back in the Volvo.

Air Intake Baffle: Volvo P1800 Air Intake Baffle Air Intake Grille: Volvo P1800 Air Intake Grille

Friday, November 27, 2009

Heater Blower Motor

The final piece for the heater blower motor is done! I've been waiting for the back plate of the blower to be returned from the sandblasting facility, and now it has 2 coats of the black POR-15 rust preventative paint on it to match the rest of the heater box. I'm just waiting for one more component of the heater box to be completed before reassembling the whole contraption. See the big difference in the before-after photos below:

Before: Volvo P1800 Heater Blower Motor - Before After: Volvo P1800 Heater Blower Motor - After
Before: Volvo P1800 Heater Fan Motor - Before After: Volvo P1800 Heater Fan Motor - After

Sunday, November 22, 2009

Heater Control Valve & Heater Fan Motor

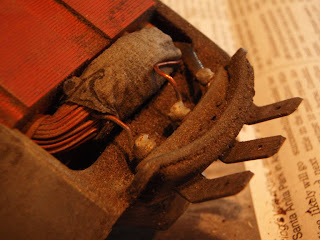
I finally have the heater control valve and the heater fan motor sorted out. I've been working on these two components for weeks, a half-hour here, a half-hour there - just whenever I have the time. The foam gasket had melted all over the heater control valve causing a tremendous mess, and the pipes had been painted over. Quick work with the Dremel rotary tool revealed a pleasant surprise - copper pipes on the heater control valve! All the moving parts and internals were also cleaned up using electronic contact cleaner and Q-tips. Why the electronic contact cleaner? There are no electrical parts in the heater control valve, but the electronic contact cleaner was all I had so I decided to give it a try. It works great, especially in dissolving the melted foam away. All it needs now is some machine oil on the moving parts and it's good to go.

Heater Control Valve - Before: Heater Control Valve - Before Heater Control Valve - After: Heater Control Valve - After

A few weeks ago, while disassembling the heater core, I discovered that the capillary sensor cable from the heater control valve was broken. Turns out that this heater control valve must have been a replacement unit at some point in the Volvo's life as it has a capillary sensor that is still in tact. The first photo above shows this capillary sensor cable with the "bulb" on the end. The theory is, the capillary cable has ether in it which expands as it exposed to heat, and thereby toggling the valves to open or close slightly to regulate the flow of heated coolant through the heater core. Well ... I've read some feedback on the 1800list that this whole contraption never really worked that well anyway in "automatically" regulating heat, and you're better off just regulating it manually via the heater control cables. I decided to put this to the test and submerged the capillary sensor cable into a pot of water over the stove and slowly heating the water to a boil. Yup - doesn't work at all! Don't bother routing it back inside the heater box where it originally belongs. Just roll the capillary sensor cable up into a neat coil, and tuck it out of sight when replacing or reinstalling the heater control valve. You'll pass out from heat exposure long before the heater control valve decides to work auomatically - case closed!

Heater Fan Motor - Before: Heater Fan Motor - Before Heater Fan Motor - After: Heater Fan Motor - After

The heater fan motor - now this thing was a piece of work! Everything had siezed up! The fan would not rotate and there was a thick layer of dirt on everything. I emptied half a spray can of electronic contact cleaner into this sucker before things started moving again. Q-tips ... lots and lots of Q-tips - that's all I have to say. I need to get some machine oil in it to lubricate the moving parts and I won't know for sure if it's going to work until I hook it back up to the car, but I have a feeling this one's going to be a winner!