I've got lots of photos to share after spending the entire weekend with a facemask on and a couple of aerosol cans of paint. The first series of photos below are of the air duct which directs fresh air to the heater unit. The color scheme that I've picked for the engine compartment is black, cast iron grey, silver (or light gray), red, with some chrome highlights. The first photo below shows the air duct in its original black color. The second photo shows bare metal after sandblasting. The third is after 2 coats of POR-15 rust preventative paint followed by 3 coats of their tie-coat primer wet sanded down to a smooth finish. The fourth photo is of the finished air duct spray painted in cast iron grey.
Air Duct in Original Condition:

| Air Duct After Sandblasting:

|
Air Duct With POR-15 + Primer:

| Air Duct With Final Color:

|
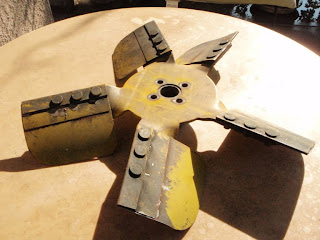
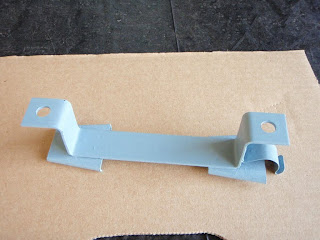
The following series of photos are before-and-after shots of the radiator fan and the support arm for the battery. They've both been sandblasted to remove any rust and old paint, coated with POR-15 rust preventative paint, and coated with primer before the final application of red paint. I think the red accents against the black, silver, and cast iron grey of the other components in the engine compartment will add some dimension to the overall pallette. I call this the "Peacekeeper Color Scheme" from the farscape television series ... it's a sci-fi thing ... nevermind! I'm sure some P1800 purists will be screaming bloody murder because I changed the original color of some of the components - they can call me on this toll-free number to "express" themselves: 1-800-EAT-SHIT. Operators are standing by.
Radiator Fan - Before:

| Radiator Fan - After:

|
Battery Support Arm - Before:

| Battery Support Arm - After:

|
This final series of photos depict the process of getting one of these components from its initial banged-up condition to the final painted stage. Pictured below is the mount for the coolant overflow bottle. I meant for this to be painted in POR-15 silver initially and left as is without any top-coat because it won't be seen once the coolant overflow bottle is reattached, but as luck would have it, the silver POR-15 dried up in the can, so I had to work with black instead and top-coat with cast iron grey. After sandblasting to remove the rust, 2 coats of POR-15 were applied (2 hours between coats) followed by 2 coats of their tie-coat primer (which I would never buy again). The first coat of primer was applied 4 hours after the final coat of POR-15, when it was dry to the touch, but tacky with a slight finger drag. I found through experimentation that this is the only way to get that 1st coat of primer to adhere. The 2nd coat of primer was applied 12 hours later (after the 1st coat dried). After yet another 12 hours of curing, the primer was wet-sanded down to a smooth finish. All of this was done days or weeks prior to this weekend's paint job of course, as there is a lot of "down time" involved waiting for stuff to dry and only being able to do one side at the time for most components. The spray painting process is fairly simple. I like to start with 2 very light coats of paint with 10 minutes between each coat. 10 minutes after the 2nd light coat, I then blast it with a medium-wet coat of paint to get that smooth shiny finish.
Coolant Overflow Bottle Mount - Before:

| After Sandblasting, POR-15 & Primer:

|
With 2 Light Coats of Paint:

| Final Coat of Paint:

|


2 comments:
see, all that air fix training you had when young coming in handy now. I got a couple of mini tamiya kits that needs fixing, I'll bring the glue and paint, colour scheme: gun metal grey, red and pearl white comes to mind. its true the toys only get bigger as we grow older
Hahaha! Yup, it's true! The toys do get bigger ... and more expensive. They say you can't take any of it with you when you leave this earth ... however, he who dies with the most toys - wins!!!
Post a Comment