Saturday, September 26, 2009

Rebuilding Rear Seat Frame - Part 1

What started as a simple 2 hour task of replacing petrified seat webbing is turning out to be a two weekend long project! Having lost their elasticity decades ago, the webbings for the rear seat frame were stiff and crumbled to the touch. Replacing them is simple enough as the seat webbing (or Pirelli webbing) is widely used by the furniture and upholstery industry, and therefore easily attainable. Upon removing the rear seat however, I discovered some minor rust spots on the seat frame and decided to take the opportunity to address those while I had everything apart.

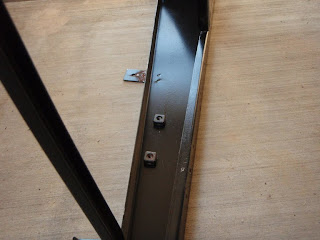
Seat Frame Before Restoration: Rear Seat Frame - Before Restoration Retainers for Mounting Screws: Seat Frame Showing Retainers

The preparation process involved removing the entire rear seat frame from the Volvo, removing all 4 rusty retainers so that they could be rust treated separately with the rotary tool, sanding away all rust flakes, and sanding down the smooth paint to provide a coarse surface for the rust preventative paint to adhere to.

Retainers - Before & After: Retainers - Before & After Backyard Paint Shop: Backyard Paint Shop

Next, the seat frame was cleaned and degreased with Marine Clean, followed by an application of Metal Ready on bare metal to chemically etch the surface for proper adhesion of the rust preventative paint. Two coats of POR-15 rust preventative paint later, and this seat frame should not rust again ... ever.

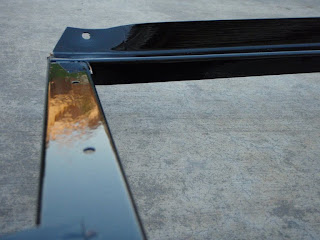
Before: Seat Frame - Before POR-15 After Seat Frame - After POR-15
Seat Frame - Before POR-15Seat Frame - After POR-15

As I did not have enough time to complete the rebuild, I'll be working on fabricating the new seat webbing and reinstalling the rear seats next weekend.

Sunday, September 20, 2009

Past & Present

My annual car wash pass expired a week ago, so I got up bright and early this morning to do the deed the old fashion way. It's been about ten years since I had to wash my own cars, but in this current economic climate, one of the company perks I'll be doing away with is the annual car wash passes. Besides, it was a very rewarding morning. I got to appreciate these vehicles a little more and was even paid a visit by "Mr. Bizarro", the creepy diabetic neighborhood cat - seen here doing his morning gymnastics. He's about 15 years old ... that's what? 102 human years?

Past & Present: Past & PresentMr. Bizarro - The Creepy Diabetic Cat: Mr. Bizarro - The Diabetic Cat

Saturday, September 19, 2009

Vent Window Latch

After weeks of staring at a rusty stub where the passenger-side vent window latch ought to be, I figured this weekend would be the time to address it. the only part that I had on hand from the purchase of the Volvo was the chrome latch handle.

Before: After:

I wasn't entirely certain of the components necessary to complete the job, however I was fortunate to have Mike Dudek of iRoll Motors identify and ship the needed parts ahead of this weekend's project. Turns out, the missing components were the plunger, spring, wavy washer, lock pin, and the black plastic push-button.

Before: Volvo 1800E Vent Window LatchAfter:

Ten rounds with the rotary tool rendered the used parts free of oxidization. Assembling the latch was a no-brainer 5 minute job. Now that the eyesore is gone, I can turn my head to the right without flipping my crazy switch!

Before: After:

Wednesday, September 16, 2009

Coco Mats Are Finally Here!

After a month-long wait, my sisal floor mats from cocomats.com have finally arrived! Custom handmade to fit the Volvo P1800, these natural auto floor mats are made from coconut fibres or fibres from the agave cactus plant (sisal). They were a bit hit in the 60's and 70's and were a popular upgrade for sport vehicles like Porsche, VW, Mercedes, BMW, Triumph and many other European cars.

One of the benefits of coco mats or sisal floor mats is that they hide dirt that is tracked into the vehicle. Dirt filters through the mat and gets trapped at the rubber bottom. A good shaking every now and then removes the trapped dirt. Not a cheap upgrade compared to regular auto floor mats, but well worth the money for that luxurious retro look. The pair that I ordered was a very well made product. The materials used were first class, and the mats felt solid - they must have weighed about 10 lbs each! It is because of this weight and the rubber nibbed bottom that the mats do not slide around and bunch up at the accelerator pedal. In addition, since these floor mats were custom made to fit my Volvo 1800E, fitment around the contours of the floor panel and around the floor mounted accelerator pedal was perfect.

Sisal Floor Mat - Driver SideSisal Floor Mat - Passenger Side

An added benefit of having these new sisal floor mats in my car is the "new car smell" due to the adhesives used in the fabrication process. Ha! Ha! A win-win for me ... I win twice! Well actually, I think cocomats.com is the real winner here, as they got my $150 bucks!

Sunday, September 13, 2009

Cleaning The Engine Bay

Spent Sunday giving the engine bay a much needed cleaning. Bought one of those spray-on foaming engine degreasers that is rinsed off with a hose after letting it sit and work its magic for 15 minutes. Well ... as you can see from the photos below, nothing magical happened here! There was absolutely no difference! Any coloration difference that you do see in these photos are due to the camera's exposure. The "before" picture was taken early in the morning when the sun was barely out, and the "after" picture was later in the day. Trust me ... nothing happened! It's gonna take way more than foam to move the 3 decades of dirt in this engine bay! As with everything else on this car that has 3 settings (lights - dim, dimmer, off), the engine bay's are greasy, greasier, greasiest. Looks like I'll have to do this the hard way ... piece-by-piece. We'll just call this morning's wasted effort the "Pre Engine Bay Detailing" exercise shall we?

Before: After:

Small Victory! Dissatisfied with this morning's defeat. I decided to take on the engine bay again later in the day, starting with the smallest part that I could remove without much hassle - the cap for the coolant overflow reservoir. Besides, I had the rotary tool all charged up and nowhere else to go. 20 Minutes later yielded the following results. Hah ha! And that's basically me turning a frown upside down!

Before: After:

Saturday, September 12, 2009